Well in honor of the our pioneer heritage we are taking this week in July to check out how life on the prairie was....no tv, dvds, video games, etc. If I was really hard core I would go totally unplugged, but realistically speaking...ya right. There is just too much hypocrite in me to do that. I shouldn't even be on the computer, but I realized that my blogging would get way too behind (plus I had to get on and pay the bills--I know just like the pioneers did ;-) ) My son would have me take the laundry out to the crik with a rock, but I reminded him that I am using the clothes line in lieu of the dryer and that if he wanted me to do that then he would be first on dish duty...
After church was out on Sunday (we don't get out until 4!!!) we got right home (after putting up all the chairs, attending ordinations, and gathering 4 children) so by 5 we were on the road. We took the kids up to pebble creek campground for an evening picnic with fishing. While the husband and the kids got the fire started (without the aid of matches or a lighter I might add) I started peeling potatoes. My oldest daughter jumped in and helped and then hubby took the kids fishing down to the crik--yup I just said crik--I finished up the potatoes and added carrots and kielbasa (doesn't sound too authentic, but I reminded the kids that the pioneers at most of their meat either as jerky or sausage because of the preservation.) I threw the dinners in the fire then realized it was way too hot for that so I retreived tin foil packets out of the fire, without tongs--using two sticks, and just placed them around the fire...better. The girls had seen fish and beauty all around and within the hour we were eating some yummy goodness. (pics on family site)
Tuesday, July 20, 2010
Saturday, July 17, 2010
Paradise Island Birthday Cake
Two years ago I decided to go out on a limb and this is what appeared. I have a magazine rack in my bathroom...and since I don't subscribe to any magazines the only ones that are there have been "gifted" by friends/family and will stay in place basically until the fall apart. (by gifted I mean either hand me down mags or stolen from their coffee tables ;-) ) Any whoooo....I digress.
 This one magazine I kept around because the cover was a super cute cake in the form of an island. It looked so fun, but I thought it was WAY out of my league. Well when my oldest daughter turned 8 she wanted a luau party so out came the mag and I used it for my inspiration. With some help from my SIL Serena I was able to finish the cake which if I do say so my self came out super cute!


 This is acutally bigger than the cake in the mag, but oh well. I used TWO yellow cake mixes in rectangle pans to get it deep enough on the sides. The frosting is tinted tan on the top and blue for the sides. The "sand" is just crushed up Nilla cookies. The sides have green fruit roll up sea weed and goldfish crackers. I added white frosting bubbles on the sides for cuteness...and black frosting dots for the eyes, there might be some gummy fish on there too. There are some Teddy graham beach combers (with frosting bathing suits) The pool is jello (a highly concentrated mixture). The palm trees are my FAVORITE part! The mag used pretzels, but I decided it would be yummier to use piroutte cookies. Plus the cookies have a cool wrap around detail that adds authenticity. The leaves on the trees are made with green melting candy put in a baggy. Cut the corner of the baggy off and squeeze and draw a leafy shape on some wax paper. Let harden and attach with more melting chocolate. The palm trees have a variety of things attached...cocopuffs for coconuts, then little fruits like bananas and oranges that are candy.

My birthday girl looks pretty pleased with her own personal island...the luau was a success even for my littlest luau girl...


My birthday girl looks pretty pleased with her own personal island...the luau was a success even for my littlest luau girl...


The smiles say it all!
Friday, July 9, 2010
Scout Camp Duty Roster

My husband has been the scout master of our ward troop for the last FOUR years. about three years ago (his first going to camp as a leader) I helped him by making a duty roster for the boys...

I just took an old piece of plywood (that had been laying around for years), some random spray paint, and tape. I had the green spray paint left over from one of my sons pinewood derby cars (the fish) so I sprayed both sides of the board (obviously letting one side dry before the other side was painted). Then I took some masking tape and taped off some lines (I think I used some paper too to avoid over spray) and painted in the white lines.

The first year we did this I found some clearance wooden tags. I didn't realize that they were clearance until the 2nd year when I went back to the craft store to get more. They were clearance because they were Christmas ornament leftovers. This year I found some round wooden circles at the ONE and ONLY craft store in my town--I would think that a town with a population over 75,000 would have more than one craft store but whatever...
Anywho...

 I drilled a hole in the top and have a friend who sells vinyl make me up some names and stuff to apply on the circles. This year I separated the boys up a bit...the older boys circles stayed natural, the younger boys got a coat of white paint, and the leaders/adults got to be true blue. This is how weird I am...in the past I have made the boys two sets...one set had the scout saying of "Do A Good Turn Daily" on the back and the other set would have the camp motto--one year it was "Eager to Soar". Well this year when I called the scout office to find out the motto they told me that there wasn't one. What up?! Worked out anyways cuz with 11 boys and 5 adults going I couldn't afford to buy that many extra wooden circles.
 Washer Fun
I betcha thought this would be a post all about laundry..tee hee! NOPE
A few weeks ago I saw a cute post about making washer necklaces using washers and a steel stamp set--at poppies at play. Upon mentioning it to my husband he reminded me that he just happened to have a steel stamp set in the garage. So...I dug thru his drawers and emerged with a few washers...
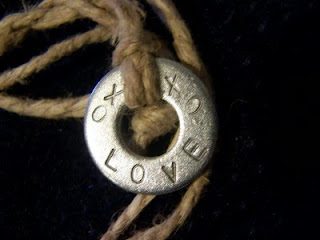 the post I saw mentioned hammering the washers so I began to bang away...at first I just put the washer on the back step and wacked it...but my husband brought me his anvil and that helped a lot. The concrete banged washer looks a bit distressed (still cute tho), then the second one I did using the anvil and it looks a lot better, and the one I pictured I didn't bang on at all.
Saturday, July 3, 2010
Mason Jar Candles

This isn't the first idea that I have borrowed/stole to make my own, but it is the FIRST that I have blogged about! WOW my first ever crafty blog entry...what is the world coming to people, my mother-in-law (MIL) just joined the facebook community, my parents send me text messages, and now I have a crafty blog. People get your 72 hour kits prepared, cuz the end must be near ;-)
Step 1: get a mason jar...I have probably like a million that are un-used. I always have illusions of canning grandeur, but I forget that canning season is in the fall--and my tomatoes and other canning things usually all ripen during the first two weeks of school--not convienient for a teacher...altho somehow lots of other teachers and other busy people can be canners --I don't know how people do it! we shall see if I am able to actually follow thru with this whole blogging thing.
back to the project...
Step 2: take your clean mason jar and attach stickers...the idea that I stole from used star stickers and since I have a very limited imagination (AND it is the 4th after all) I really wanted stars...plus I have a star infatuation right now...I had a dandy of a time finding star stickers...anyways I found them and was able to stick them on...
 Step 3: get some spray on frosted glass found in/near the spray paint section...you only need to spray on one coat and since I did mine in like 80 degree weather outside they were dry in less than an hour.
Step 4: you remove the stickers...I have discovered that the kind of stickers that work best are plastic stickers. I used some cute daisy flower stickers but they were a papery kind and they work ok but take more effort to them get off...
Step 5: get some twine to wrap around the top for decorative purposes and insert a tealight candle and....


sooo cute and festive...I ended up making about 20 of these to put outside on the deck.
and was able to let the kids help. One of my daughters designed this jar with an R for her first initial and even picked which beads to use.

Subscribe to:
Comments (Atom)