Tuesday, August 3, 2010

My NEW biggest WANT--A silhouette!

Ok so for about a year now I have been lusting after.....
 Cricut personal cutting machines by Provo Craft let you express your creativity how and where you want. Cricut is the leading personal cutter thanks to its ease of use, computer-free operation and world-class artwork.
but recently on SEVERAL of the blogs that I stalk I have noticed them mentioning....

the Silhouette...
either in their everyday crafting
or in various giveaways (hence this blog entry as a method of entering one of such give-aways)

I was AMAZED at all the things that the cricut could do...they do have an amazing info-mercial and since we don't have cable or satellite frequently it is the only thing to watch during the wee hours.

BUT while I have thought that cricut was wonderful...I have also noticed that you have to constantly be buying this or that for it and the this's and that's COST $$$--cha ching....these things add up FAST....

and I have also thought wouldn't it be cool to be able to just hook it to my computer...well apparently I wasn't the only person who thought it would be cool to hook it to my computer...

THE SILHOUETTE hooks to my computer just like a printer...well it would hook to my computer if I had one...for now I will just have to imagine it hooked to my computer...ahhhh  imagination....IF ONLY

The things I could do with a silhouette:
1-25. cut MY OWN vinyl for whatever around the house labeling project I want, whenever I want, without having to bug my vinyl lady constantly (sorry Jenn).
2.  label my entire pantry with cuter labels than my label maker can do
3.  label the laundry room supplies (detergent, bleach, softener, dryer sheets, stain remover, darks, lights, whites, shirts, towels, jeans, etc)
4.  label the craft closet supplies (paint, fabric, kids crafts, etc)
5.  label the kids toy bins (army guys, legos, polly pockets, pet shops, etc)
6.  label the kids clothes drawers  (socks, underwear, pants, shirtes, etc)
7.  label movies as OURS to help those that borrow remember
8.  label inside of kitchen cupboard with a menu board  (one side already has a recipe label/holder)
9.  label school supplies for kids so I don't have to write their name 1500 times (altho I love my kidlets so I could write their names a jillion times if I had to.)
10. label my label maker ;-)
11. label my christmas decor boxes so I can find what I need to find
12. label my halloween decor boxes
13. label my easter decor boxes
14. label my valentine decor box
15. label the various boxes that I have stuff set aside for the kidlets later on in life
16. label my and my husbands high school memoirs boxes
17. label
18. label
19. label
20. label
21. label
22. label
23. label
24. label
25. label and then label some more!
26. stencils
27. classroom decor
28. classroom supplies
29. classroom lesson plan stuff
30. classroom bulletin boards
31. classroom sharing
32. PRESENTS
33. super cute crafts
34. the coolest posters ever for my kidlets school projects
35. super cute scrapbook stuff
36.  create the cutest peacock room that my daughter will LOVE!  (maybe that's a bad idea...might never get her out of there!)
37. make super cute cut outs for my primary class
38. make super cute guitar/music room for another daughter!
39. just saw a super cutie fairy idea for my littlest fairy!
40.  I am sure that there is some manly ideas just on the cusp of my brain for my oldest--just entering high school this fall --eeek!!  I bet he could use it for some of those school projects--(his hand writing..how oh how could I as a teacher have a son with handwriting like THAT!)  OMGG (oh my goodness gracious!)


check out the giveaways and to see real information for this on:

http://www.sugardoodle.info/joomla/

http://www.theidearoom.net/2010/08/silhouette-giveaway.html

http://www.theshabbychiccottage.net/2010/08/silhouette-giveaway.html


Saturday, July 31, 2010

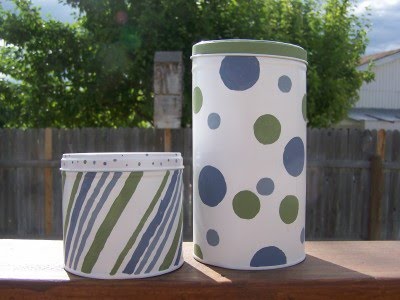
Cute Can Container Re-Do


I use Pirouette cookies a lot in my birthday cakes' decor.  So the container gets empty really fast..."oh dang this one is broken can't use it on the cake, guess I'll have to eat it"..."one for the cake, one for me, one for the cake, two for me"   you get the idea...but I can't throw them away....after all they are perfectly good containers....so I kept them around trying to figure out what I was going to do with them...I thought about sand blasting the factory design off of them...but I don't have a sand blaster AND they are really expensive to rent AND cost a lot to buy....I didn't think that spray paint would stick...BUT IT DID!!
Years ago I spray painted a desk and bunk beds white (I don't remember why I spray painted them-- it made sense at the time...maybe one day soon I will get pics of them on here) so I have LOTS of white spray paint left over...well not so much now...this project finished off a can and worked on another....


Step 1: After emptying tasty treat from can...

Step 2:  spray paint (it took me at least two coats)
Step 3:  trace a design (I traced different sized buttons)  if you have a steadier hand than I you can skip this step.


Step 4:  Paint your design
As you can see I REALLY like Pirouette cookies.


Friday, July 30, 2010

Football Birthday Cake

Football Birthday Cake

Soooo since my son has started playing football....and since he had a birthday....I decided to combine the two into a cake for him....not as manly as his 14 years, but still fun none-the-less.


I think the hardest part of this cake was getting the icing the right color.  It took the entire time the cake baked and then some to get right.  I started off with a chocolate cake.  After it had cooled for a little bit I stuck in in the freezer while I finished making the icing.  The red kept looking pink, then darker pink, then even darker pink.  Even using the no-taste red Wilton food coloring I was surprised that for just two tablespoons of white icing I had to use almost 1/2 the container of coloring!  Then when it came time for the blue I was prepared and just stuck a ton in from the beginning.


All of this was done in between going to various different doctors visits.  I was amazed that everything managed to get done.  I had planned on using the red and blue to create jerseys on the Teddy Grahams, but decided that numbers was easier and just as effective.  I was going to use the leftover white from making the field lines to make pants and I had made some black to make helmets.  I decided that was a lot more work than was necessary, so we used the black to make stripes for the referees.


 After a lot of contemplation of what edible treat could be used a football I decided to go with almonds.  I happen to have some snacking almonds in the cupboard.  I had originally thought of chocolate covered, but cha-ching those things are PRICEY!!  So I just added the stitching and voila.  Since he's 14 I put 14 almonds around the edge of the cake and one in the "game".

Below you can see a pic of the finished product...complete with scoreboard and uprights(goal posts).  The scoreboard is just a graham cracker and all the posts are Piroette cookies (mint flavored...yum-mee)

Wednesday, July 28, 2010

Cute as a Button!!

Pioneer Fun Day #3 Sewing Lesson--Cute Button Headband

Ok.  I stole, yes STOLE!, this idea right off of another website.  I lifted the idea right off of her site and put it on my own.  I have only changed one thing~ the girls in the pics.  And the buttons used.  And the technique is probably lacking in finesse and accuracy. and oh well you get the picture...
Step 1: choose your buttons and measure out a strip of elastic.  I used the girls heads to measure and made sure that the elastic overlapped so it could be sewed together.  Ended up using about 19 inches of elastic per headband.  I chose black elastic because I know my girls and white elastic would end up dirty way too fast.  Took the girls with me to the store to pick out buttons.  If I was more crafty I would have already had a ton, but I only have the random buttons that come extra with a shirt or pants or whatever...cuz the clothing manufactures have so much faith in their workmanship that they KNOW you will be needing the extra buttons, or else they are saying "ok.  here you go clutzo we know you are going to end up ripping the buttons right off so we got your back."  If they only knew that I am WAY too l-a-z-y to reattach the stupid buttons that come off, cuz I usually end up ripping the pocket buttons off cuz I am a clutzo....
Anyways buttons were on sale at the store MY lucky day 50% off!!! so we got TONS!  More cute headbands to follow....good thing my girls LOVE wearing headbands.  Let them each pick a package of buttons then I picked a few and then I noticed that there were some specialty buttons for .50 cents a pack on clearance so I picked a few more and then a few more.....ended up coming out of the store with like $10 of buttons and $3 of elastic.  I measured out about 11 inches of headband and had the girls each line up their buttons (11 inches worth).  The website that I STOLE from recommended gluing the buttons onto the elastic so we did this with just Elmer's glue.  (I figured that it would dry clear and any excess would just flake off...well it worked ok, but Sariah didn't like the end result and I think I agree next time we'll just line them up and go from there.  The buttons didn't seem to want to stay attached and ended up falling off  which is fine cuz they are going to be sewed on anyways, but kind of a pain...ah well  live and learn


  Each of the girls was already able to thread a needle-THANK YOU MERE'S-so I just gave them a quick review and away they went.


sewing fun!
I let Leah play with the camera while they were sewing and these are some of the shots that she got...
I did get to teach the girls how to know their thread...pretty cool trick I learned from a wonderful Sister in an previous ward.

Mommy messy hair and all..but as you can see by the buckies we are having Fun!
Sleepy girl with her mi-mi...yes we still have a mi-mi, but at least she's potty trained.


Here is my youngest sporting the finished product...pretty cute if I do say so myself...well of course she is, but so is the headband.

Tuesday, July 20, 2010

Pioneer Fun Day #1 Tin Foil Dinners

Well in honor of the our pioneer heritage we are taking this week in July to check out how life on the prairie was....no tv, dvds, video games, etc.  If I was really hard core I would go totally unplugged, but realistically speaking...ya right.  There is just too much hypocrite in me to do that.  I shouldn't even be on the computer, but I realized that my blogging would get way too behind (plus I had to get on and pay the bills--I know just like the pioneers did ;-) )  My son would have me take the laundry out to the crik with a rock, but I reminded him that I am using the clothes line in lieu of the dryer and that if he wanted me to do that then he would be first on dish duty...
After church was out on Sunday (we don't get out until 4!!!) we got right home (after putting up all the chairs, attending ordinations, and gathering 4 children)  so by 5 we were on the road.  We took the kids up to pebble creek campground for an evening picnic with fishing.  While the husband and the kids got the fire started (without the aid of matches or a lighter I might add)  I started peeling potatoes.  My oldest daughter jumped in and helped  and then hubby took the kids fishing down to the crik--yup I just said crik--I finished up the potatoes and added carrots and kielbasa (doesn't sound too authentic, but I reminded the kids that the pioneers at most of their meat either as jerky or sausage because of the preservation.)  I threw the dinners in the fire then realized it was way too hot for that so I retreived tin foil packets out of the fire, without tongs--using two sticks, and just placed them around the fire...better.  The girls had seen fish and beauty all around and within the hour we were eating some yummy goodness.  (pics on family site)

Saturday, July 17, 2010

Paradise Island Birthday Cake

Two years ago I decided to go out on a limb and this is what appeared.  I have a magazine rack in my bathroom...and since I don't subscribe to any magazines the only ones that are there have been "gifted" by friends/family and will stay in place basically until the fall apart.  (by gifted I mean either hand me down mags or stolen from their coffee tables ;-) )  Any whoooo....I digress.
This one magazine I kept around because the cover was a super cute cake in the form of an island.  It looked so fun, but I thought it was WAY out of my league.  Well when my oldest daughter turned 8 she wanted a luau party so out came the mag and I used it for my inspiration.  With some help from my SIL Serena I was able to finish the cake which if I do say so my self came out super cute!
This is acutally bigger than the cake in the mag, but oh well.  I used TWO yellow cake mixes in rectangle pans to get it deep enough on the sides.  The frosting is tinted tan on the top and blue for the sides.  The "sand" is just crushed up Nilla cookies.  The sides have green fruit roll up sea weed and goldfish crackers.  I added white frosting bubbles on the sides for cuteness...and black frosting dots for the eyes, there might be some gummy fish on there too.  There are some Teddy graham beach combers (with frosting bathing suits)  The pool is jello (a highly concentrated mixture).  The palm trees are my FAVORITE part!  The mag used pretzels, but I decided it would be yummier to use piroutte cookies.  Plus the cookies have a cool wrap around detail that adds authenticity.  The leaves on the trees are made with green melting candy put in a baggy.  Cut the corner of the baggy off and squeeze and draw a leafy shape on some wax paper.  Let harden and attach with more melting chocolate.  The palm trees have a variety of things attached...cocopuffs for coconuts, then little fruits like bananas and oranges that are candy.

My birthday girl looks pretty pleased with her own personal island...the luau was a success even for my littlest luau girl...


The smiles say it all!

Friday, July 9, 2010

Scout Camp Duty Roster

My husband has been the scout master of our ward troop for the last FOUR years.  about three years ago (his first going to camp as a leader) I helped him by making a duty roster for the boys...
I just took an old piece of plywood (that had been laying around for years), some random spray paint, and tape.  I had the green spray paint left over from one of my sons pinewood derby cars (the fish) so I sprayed both sides of the board (obviously letting one side dry before the other side was painted).  Then I took some masking tape and taped off some lines (I think I used some paper too to avoid over spray) and painted in the white lines.
The first year we did this I found some clearance wooden tags.  I didn't realize that they were clearance until the 2nd year when I went back to the craft store to get more.  They were clearance because they were Christmas ornament leftovers.  This year I found some round wooden circles at the ONE and ONLY craft store in my town--I would think that a town with a population over 75,000 would have more than one craft store but whatever...
Anywho...
I drilled a hole in the top and have a friend who sells vinyl make me up some names and stuff to apply on the circles.  This year I separated the boys up a bit...the older boys circles stayed natural, the younger boys got a coat of white paint, and the leaders/adults got to be true blue.  This is how weird I am...in the past I have made the boys two sets...one set had the scout saying of "Do A Good Turn Daily" on the back and the other set would have the camp motto--one year it was "Eager to Soar".  Well this year when I called the scout office to find out the motto they told me that there wasn't one.  What up?!  Worked out anyways cuz with 11 boys and 5 adults going I couldn't afford to buy that many extra wooden circles.